10 Practical Nonogram Tips for Beginners
10 Practical Nonogram Tips for Beginners
A nonogram can look impenetrable when you first sit down with it. Every line seems to have too many possibilities, and picking a starting cell feels like a guess. It is not — the logic is there, waiting to be uncovered in the right order.
These ten tips are concrete and move-by-move. Each gives you something specific to check before placing a cell, a cross, or a decision that changes the puzzle. Work through them in order the first time; eventually they become instinct.
1. Read Every Clue Before Placing Anything
The single most important habit is patience at the start. Before touching any cell, read all the row clues and all the column clues.

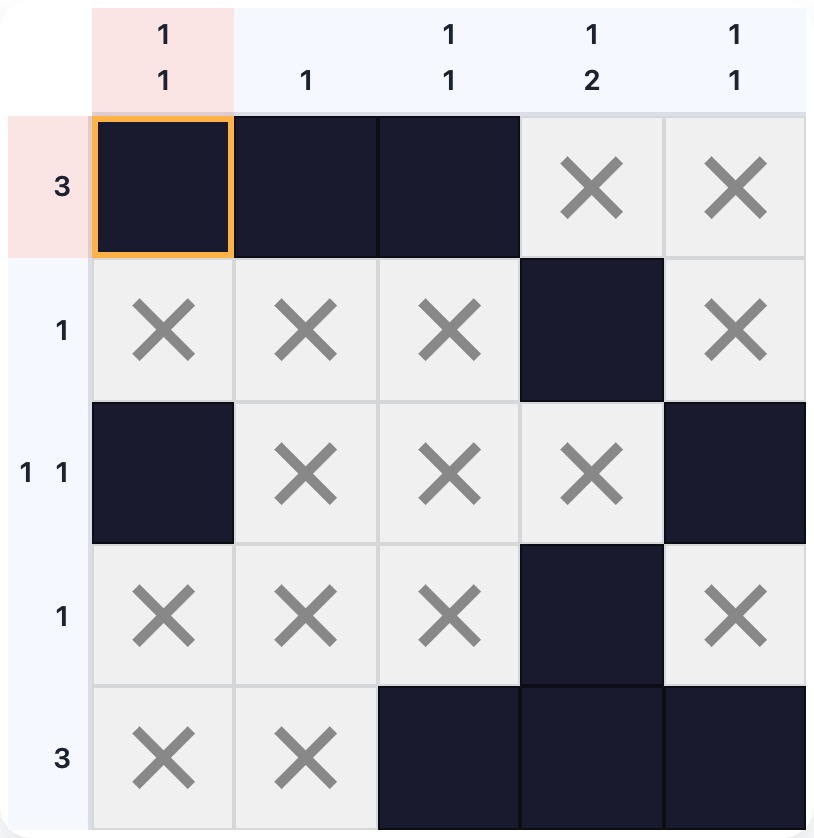
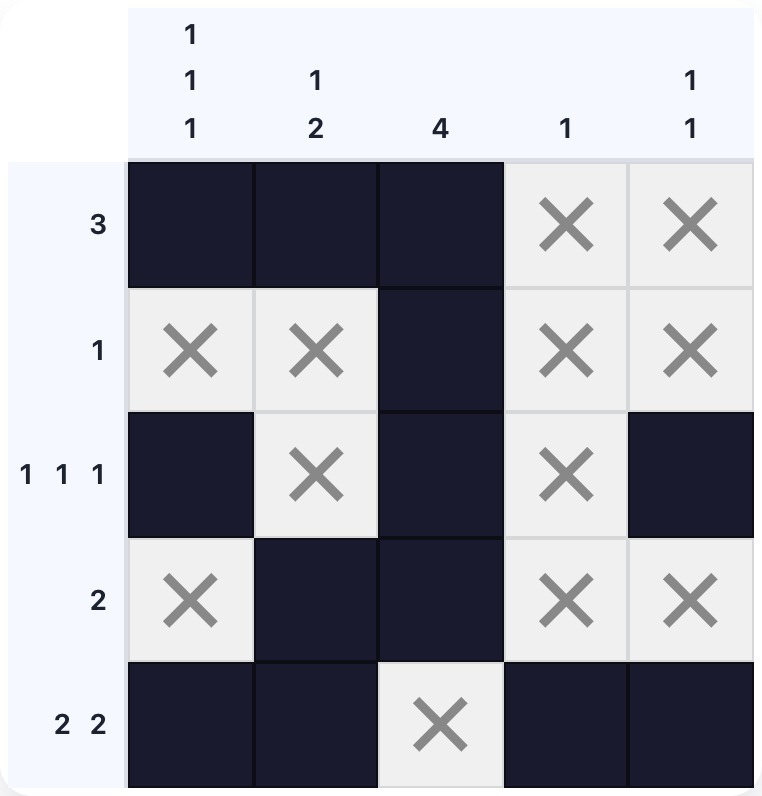
This 5×5 has row clues 3, 1, 1 1 1, 2, and 2 2, and column clues 1 1 1, 1 2, 4, 1, and 1 1. Each type requires a different approach. Scanning them all first reveals which lines are largest, which are forced, and which pairs of rows and columns will interact most — before any cell is touched.
The scan takes under a minute in most puzzles and immediately shows you which lines to prioritise. Looking for the largest clue relative to line length is the most productive first pass. A clue of 4 in a 5-wide row is far easier to start with than a clue of 1 in a 10-wide row.
Beginners often jump to the first row and start placing cells immediately. This works fine when that row has a large or forced clue — but when it does not, it leads to tentative placements that block the real deductions visible elsewhere.
2. Solve Forced Lines First
A forced line is any row or column where the clue's minimum span equals the line length. The minimum span is the total of all group lengths plus one gap between each pair of groups. If that sum equals the line length, every cell position is fixed.
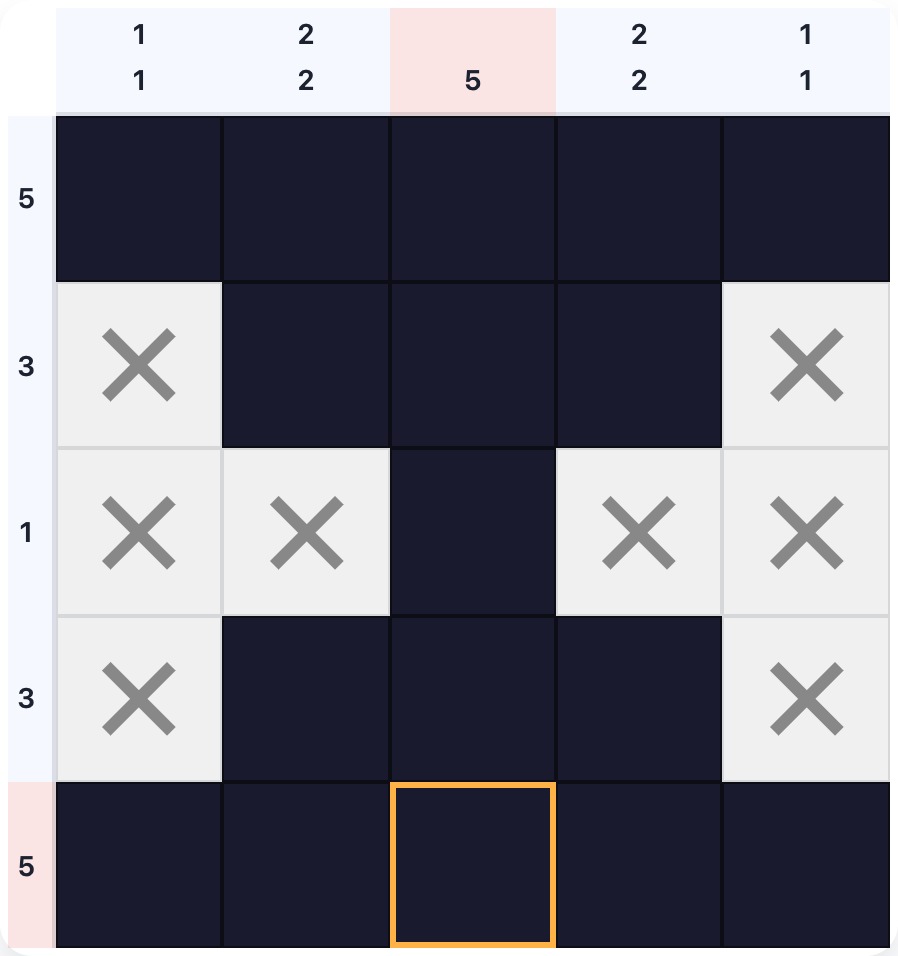
Rows 0 and 4 both have clue 5 in a 5-wide grid — no ambiguity at all, fill every cell. Row 1 has clue 3: minimum span is 3, so 2 cells of slack, not forced — but the overlap method (tip 3) still gives you the middle cell. Row 2 has clue 1 — very flexible, save it for later.
After scanning all clues, make a first pass placing only forced lines. Each forced line fills cells in multiple columns or rows simultaneously, cascading information before you do any harder analysis.
Forced lines also appear in multi-group clues. A row of width seven with clues 3 3 has minimum span 3 + 1 + 3 = 7 — the whole row is forced even though there are two separate groups. Always calculate the minimum span before assuming a line is flexible.
3. Use the Overlap Method for Large Clues
When a clue is not forced, it still constrains the line. The overlap method finds the cells that must be filled regardless of the exact group position.
The idea: mentally slide the group to its leftmost legal position and note which cells it covers. Then slide it to its rightmost position. Any cell covered in both positions is guaranteed to be filled.
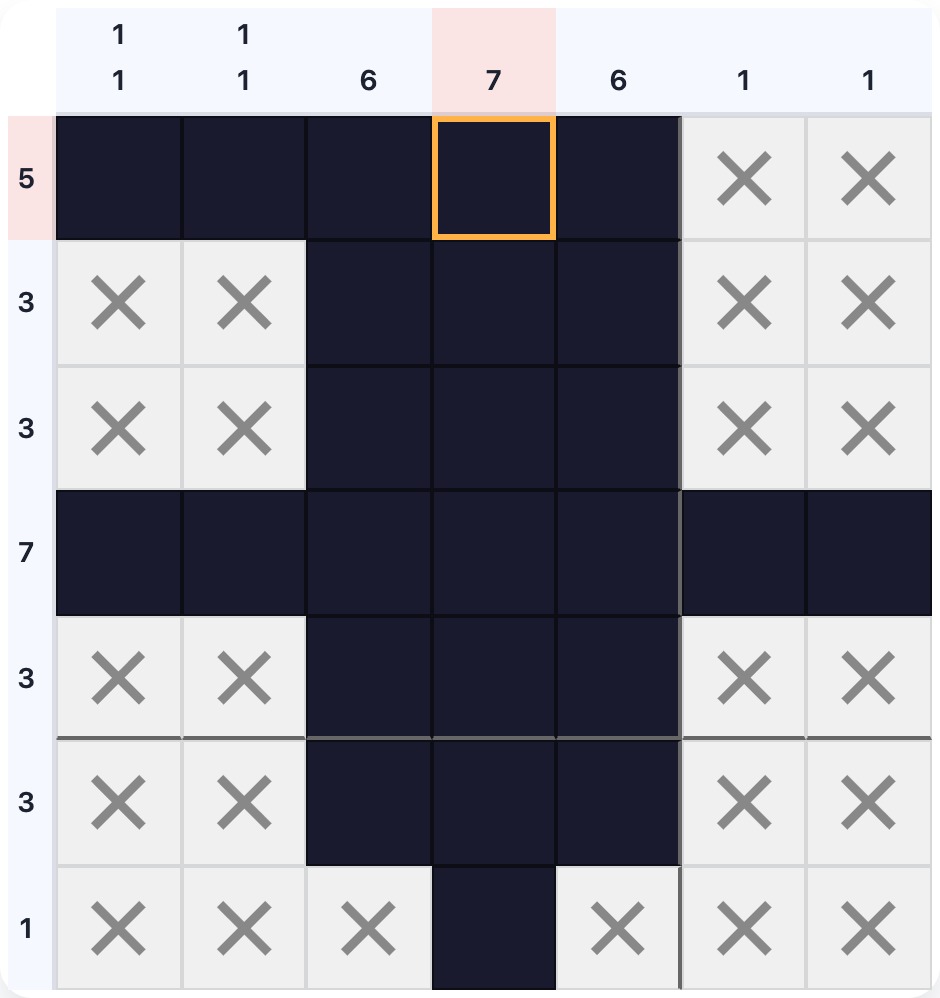
Row 0 has clue 5 in a 7-wide grid. Leftmost position: columns 0–4. Rightmost: columns 2–6. Overlap (guaranteed): columns 2–4. The selected cell at column 3 is in the centre of this zone. Row 3 has clue 7, a forced line — fill it immediately before applying the overlap method to the other rows.
The formula for the overlap zone is straightforward. For a single group of length G in a line of width W, the overlap covers cells from position W - G to position G - 1 (zero-indexed). For clue 5 in width 7: overlap starts at 7 - 5 = 2 and ends at 5 - 1 = 4. That is columns 2, 3, 4 — three guaranteed cells.
Apply the overlap method to every clue in the puzzle that is longer than half the line length. Smaller clues produce no overlap, but once you have filled some cells from other deductions, revisit those lines — the constraints may have tightened enough to produce overlap by then.
4. Fill the Overlap Zone, Then Cross the Edges
After identifying the overlap zone, fill those cells immediately. Then think about the edges of the line — if the leftmost position of the group starts more than zero cells from the edge, the cells before the group's leftmost start cannot be filled. Cross them out.
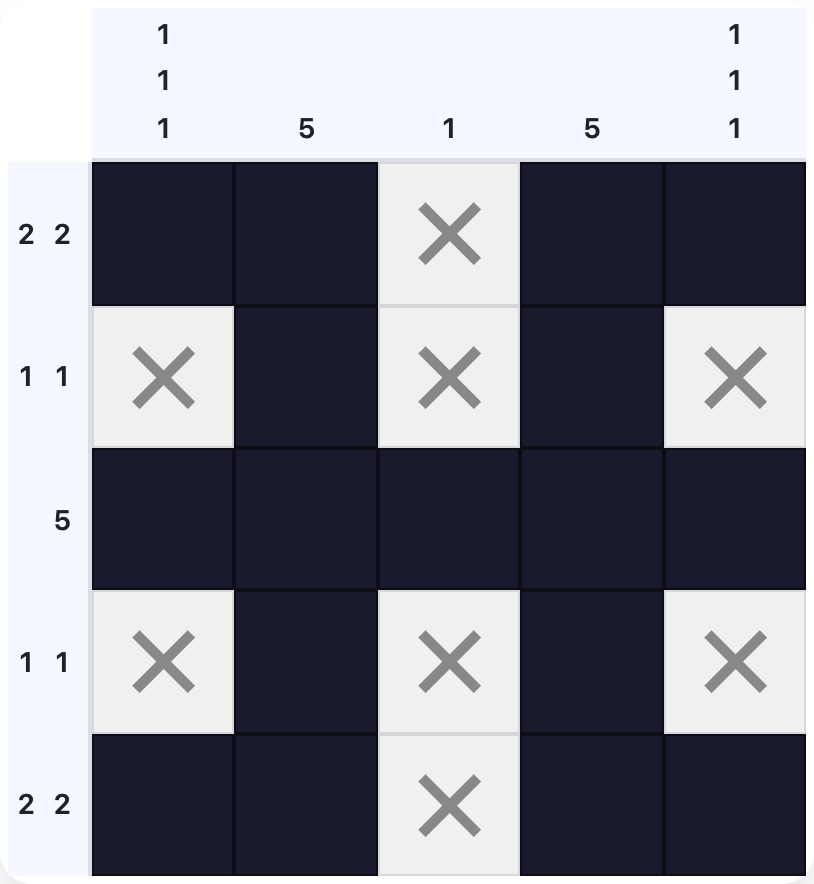
This symmetric puzzle has rows 2 2, 1 1, 5, 1 1, and 2 2, with columns 1 1 1, 5, 1, 5, and 1 1 1. Row 2 is forced (clue 5, width 5). Columns 1 and 3 each have clue 5 — also forced, every cell filled. Once those three lines are solved, the remaining cells in rows 0, 1, 3, and 4 are constrained enough that the edge crosses become obvious.
This tip is about closing the loop after an overlap deduction. Filling the guaranteed cells is the first move; crossing the cells that no position can reach is the second. Both placements count. Together they give the columns at each filled position a new constraint and the columns at each crossed position a guarantee that the group does not occupy them.
Developing the habit of crossing edge cells immediately after filling the overlap zone is one of the fastest ways to break open a puzzle.
5. Place Crosses as Soon as You Can Prove a Cell Is Empty
Crosses are often treated as optional or decorative. They are neither. A cross is a deduction, and skipping it means losing information that would have helped the neighbouring line.
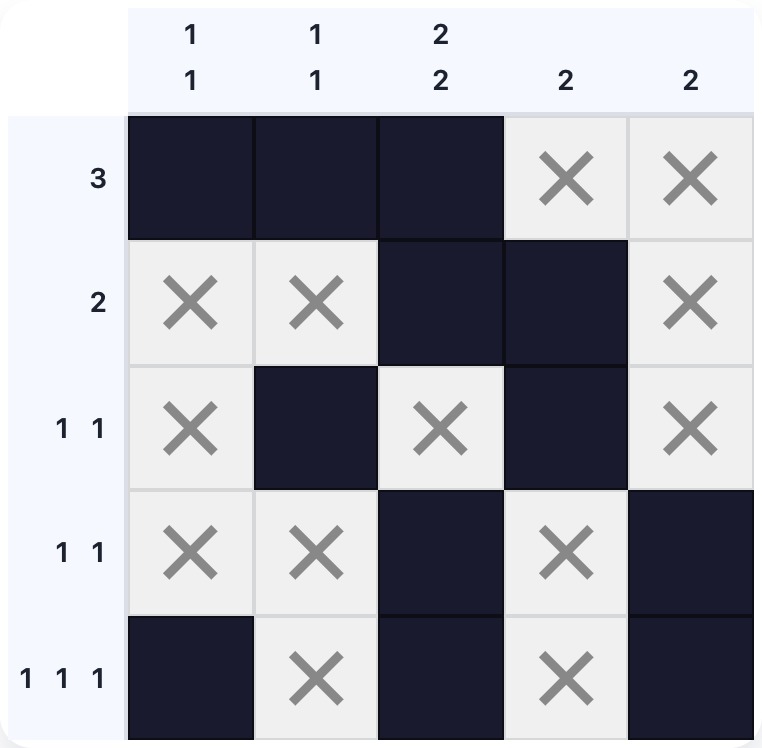
Row 0 has clue 3. The group sits at columns 0–2; columns 3 and 4 are crossed. Row 1 has clue 2, with the group at columns 0–1; columns 2, 3, and 4 are crossed. Every cross in row 0 and row 1 tells the corresponding column something new — column 4's clue 2 now knows its group cannot include rows 0 or 1.
Two reliable rules for placing crosses:
First, after a group is completely determined, cross every cell in that line that the group does not cover. This immediately tells five or more columns (or rows) that the group is absent from those positions.
Second, if the leftmost or rightmost position of a group still does not reach a particular cell, that cell cannot belong to the group. Cross it. This is the directional version of the overlap method, applied to the cells outside the overlap zone.
Cross placement is not the last step in solving a line — it is the step that solves the next line.
6. Let Crosses Unlock Stuck Lines
A cross in one line is a cell restriction in another. Once you start treating crosses as active information rather than passive labels, you will find that many lines that looked blocked become solvable immediately after a cross is added.
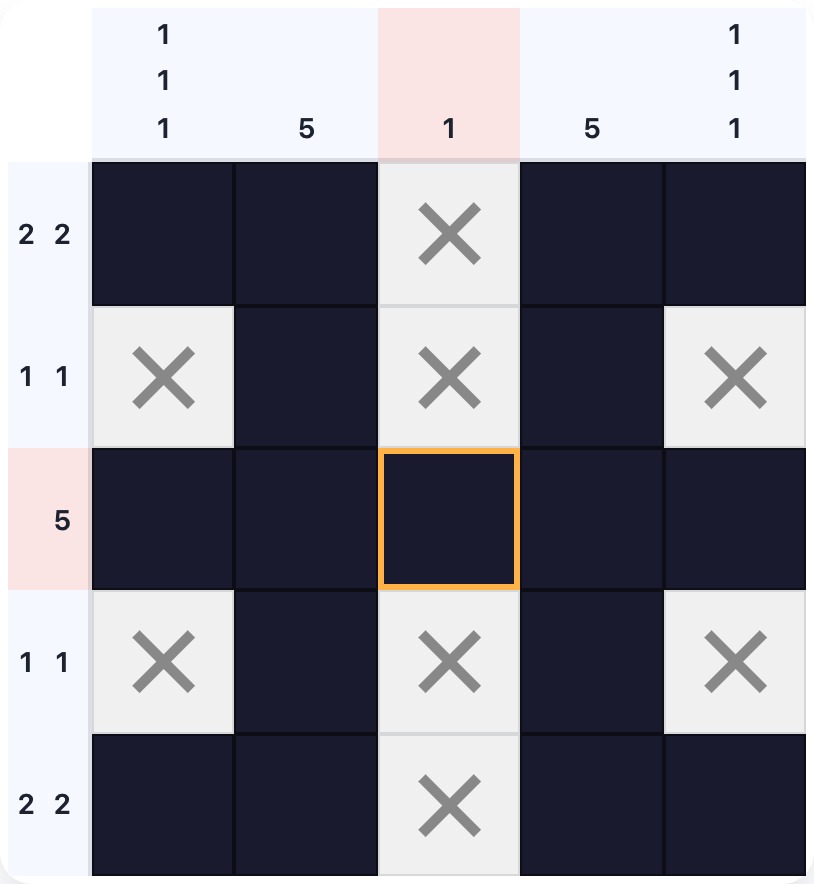
Column 2 has clue 1 — exactly one cell is filled in the entire column. Once row 2 is solved (it is the forced 5-wide row), the filled cell at column 2 is at row 2. Every other cell in column 2 must be crossed. Those crosses tell rows 0, 1, 3, and 4 that they have no fill in column 2. For rows 0 and 4 (clue 2 2), this eliminates one possible position for the second group.
When you find yourself stuck, look for lines with small total clues relative to their length — they are the most constrained by crosses from other lines. A column with clue 1 in a ten-tall grid means nine of its cells are empty. Any cross from a solved row immediately places that group in one of the remaining cells.
The systematic approach: after placing any cross, immediately check whether the intersecting line has become solvable. Cross → check column. Cross in that column → check the rows it touches. This chain reaction is responsible for most of the rapid progress in a well-run solve.
7. Alternate Between Rows and Columns After Every Placement
Solving all rows first and then all columns is the least efficient approach. Information flows both ways through every cell. Each placement — fill or cross — changes both the row and the column it sits in.
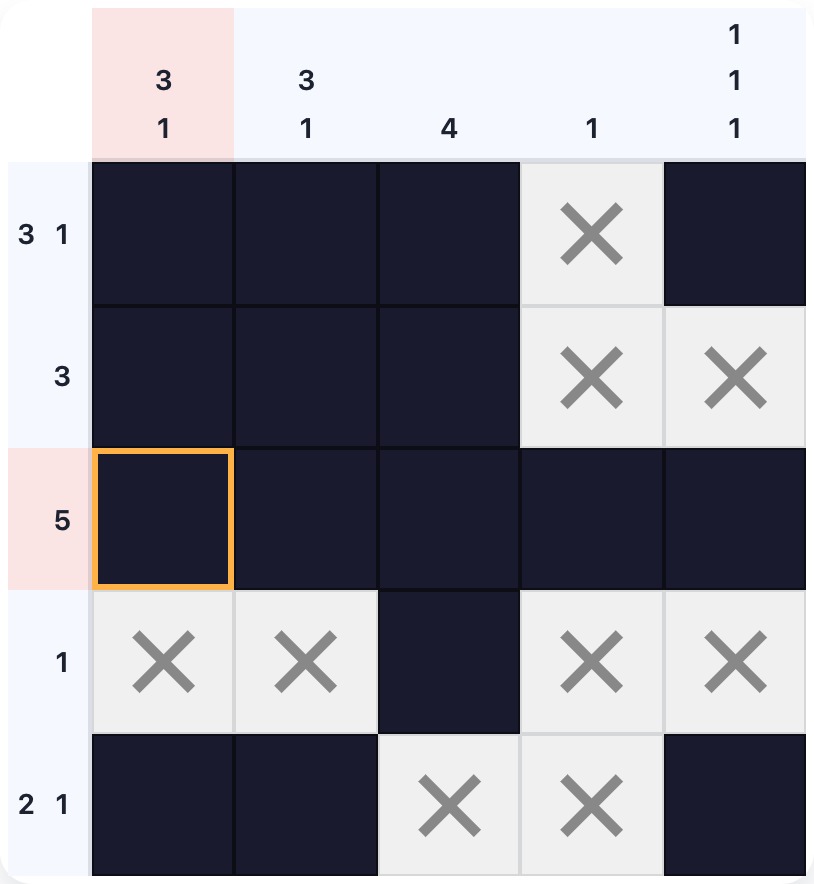
This puzzle has row 2 with clue 5 (forced: fill immediately). That fills column 0 at row 2 — column 0 has clue 3 1, and the filled cell at row 2 is part of a chain. Now check column 0: given the clue 3 1, the chain at row 2 extends upward to rows 0 and 1. This fills three column cells before a second row is even analysed.
The practical habit is simple: after every single fill or cross, check both the row and the column for any new deduction. Most of the time one direction will have already been analysed and will not change — but occasionally the new cell unlocks something immediately, and catching it right away keeps momentum.
Alternating directions also reduces backtracking. Errors introduced by solving one direction in isolation are often caught quickly when you cross-check the other.
8. Anchor Groups to the Edge When a Clue Touches It
A group that is constrained to start at the edge of a line — because no legal position leaves any room before the first cell — is anchored. Anchored groups are fully resolved from that edge inward, regardless of the overlap with the other end.
Row 0 has clue 3 in a 5-wide grid. With no other clues constraining it, the leftmost position is columns 0–2 and the rightmost is columns 2–4 — only the middle cell (column 2) is guaranteed by overlap. But if column 0 is already confirmed as filled (from column deductions), the group is anchored: it must start at column 0 and occupy exactly columns 0, 1, and 2. All ambiguity is resolved. Row 4 shows the mirror: clue 3 anchored to the right edge, occupying columns 2, 3, 4.
Anchoring most commonly occurs when a column (or row) deduction confirms the first or last cell of a group. Once that edge cell is filled, the group must extend from there with no gap — and the full group length is placed in one step.
Always check whether a filled edge cell anchors a group. When it does, extend the group its full length inward and place the cross on the far side.
9. Revisit Every Affected Line After Each New Cell
A placement is never finished when you set down a single cell. Every fill and every cross changes the constraints for two lines — the row and the column. Both deserve immediate re-examination.
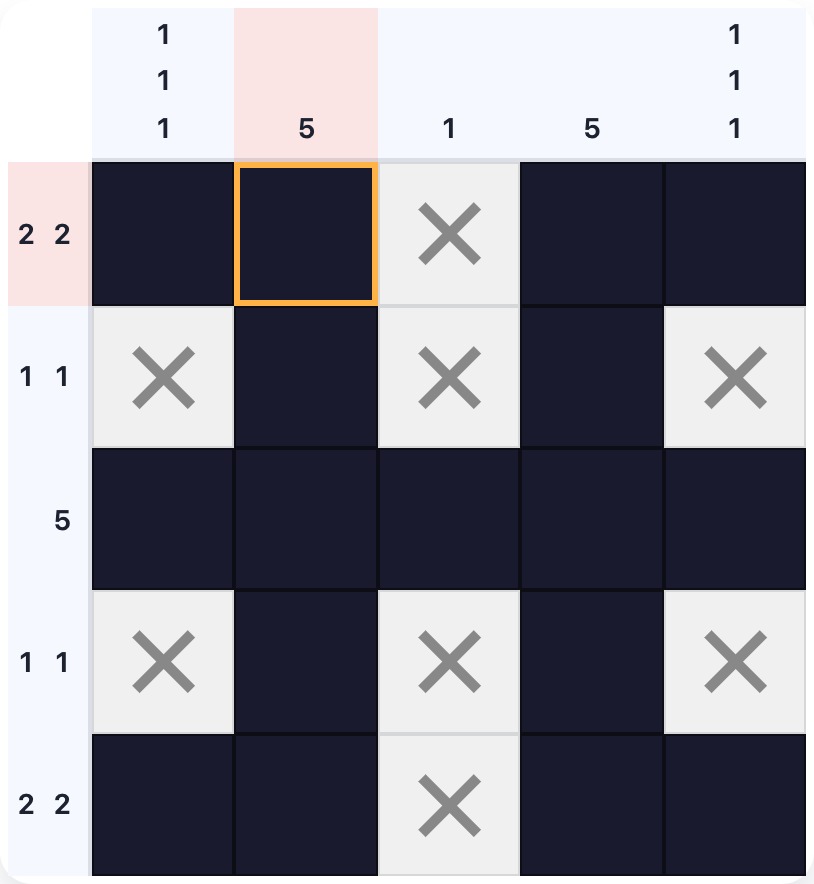
Column 1 has clue 5 — a forced column, every cell filled. When that column is solved, rows 0 through 4 each gain a filled cell at column 1. Row 0 has clue 2 2; knowing column 1 is filled locks the first group at columns 0–1 (the only pair of consecutive cells that includes column 1 and fits before the centre gap). That immediately crosses column 2 for row 0, which then informs column 2's clue 1.
The cascade of small deductions — each one triggering the next — is what makes a clean nonogram solve feel smooth. The player who stops after every placement and checks both directions will solve the same puzzle in far fewer passes than one who processes lines in bulk.
Keep a mental (or physical) list of lines that have just changed. A simple rule: when you fill or cross a cell, add that cell's row and column to a queue. Work through the queue before moving to a new area of the puzzle.
10. If You Are Stuck, Look Again Before Moving On
Nonograms that feel impossible are almost never actually stuck. The next deduction is usually in a line that has recently changed but has not been re-examined.
This 5×5 has rows 3, 1, 1 1 1, 2, and 2 2, and columns 1 1 1, 1 2, 4, 1, and 1 1. At first glance, several lines look flexible. But column 2 with clue 4 locks in four of its five cells. Column 3 with clue 1 leaves only one possible position given what the rows tell us. Every single cell is determined by logic — no guess is ever needed.
When you hit a wall, run through this checklist before guessing:
- Have you applied the overlap method to every large clue? Even a single newly placed cell might have pushed a group's slack down enough to produce new overlap.
- Have you placed all possible crosses? After filling the last cell in any row or column, cross everything else in that line immediately.
- Have you re-examined the lines touched by your last five placements? New cells restrict old lines. A column that looked fully ambiguous three moves ago might be pinned now.
- Have you checked multi-group clues for group separation? If a row has clue 2 3 and the group of 2 is placed, the group of 3 must start at least two cells to the right of it (filled + gap). That restriction often pins the second group completely.
Guessing creates two paths and risk. A second look at a recently changed line almost always produces the next deduction — and it costs nothing.
Put the Tips Together
None of these tips works alone. The cleanest solvers apply them in combination: they read all clues first, find forced lines, apply overlap, place crosses immediately, alternate directions, and check every affected line after every move.
The best way to build these habits is through practice. Play nonograms on Playboard — new puzzles are available immediately with no sign-up, and the puzzle mode lets you mark crosses and fills at your own pace.
Frequently Asked Questions
- What is the most useful habit to build when solving nonograms?
- Alternating between rows and columns after every single placement. Each filled or crossed cell changes the constraints in both its row and its column. Solvers who check both directions immediately after each move find the next deduction far faster than those who exhaust one direction before touching the other.
- How do I find the first cell to fill when a puzzle looks blank?
- Find the largest clue relative to the line length and apply the overlap method. The guaranteed zone — the cells covered by both the leftmost and rightmost legal positions of the group — gives you cells to fill without knowing the exact placement. Large clues in short lines always produce the biggest overlap zones.
- Is it ever correct to guess in a nonogram?
- Almost never in a well-formed puzzle. Every standard nonogram has a unique solution that can be reached by logic alone. If you are stuck, the next deduction is usually in a line you have not fully re-examined since your last placement. A second pass almost always reveals it.
- When should I use crosses?
- As soon as you can prove a cell cannot be filled. After a group is completely placed, every cell in that row or column outside the group should be crossed immediately. Crosses are not optional notation — they actively restrict neighbouring lines and often unlock a position that looked unsolvable.
- Does the order in which I read clues matter?
- Yes. Clue numbers must match groups in order, left to right for rows and top to bottom for columns. A clue of 1 3 means a single cell first and a group of three second — never the reverse. Reading the order correctly prevents illegal placements that look correct at a glance.
- What is the minimum span of a clue and why does it matter?
- The minimum span is the smallest number of cells a clue must occupy — the sum of all group lengths plus one mandatory gap between each pair of groups. If the minimum span equals the line length, the entire line is forced with no ambiguity. Even when it falls short, the minimum span tells you how much room is left over, which is exactly the calculation behind the overlap method.