Battleship Strategy Guide
Battleship Strategy Guide
Battleship is a game of hidden information and systematic deduction. Your opponent's fleet of five ships — Carrier (5 cells), Battleship (4 cells), Cruiser (3 cells), Submarine (3 cells), and Destroyer (2 cells) — is hidden on a 10×10 grid. Your task is to find and sink all five before your fleet is destroyed.
Every shot you fire is information. The difference between a good player and a poor one is how efficiently they extract information from each shot and how disciplined their search pattern is.
1. The Two Phases: Hunt and Target
Every turn in battleship falls into one of two modes.
Hunt mode is active when you have no open hits to follow up on. Your goal is to find a ship you have not located yet. The key constraint: do not fire randomly. Random shots waste turns on cells that could not contribute useful information.
Target mode begins the moment you score a hit. Your goal shifts to sinking that specific ship as efficiently as possible — finding its full length and calling every cell it occupies.
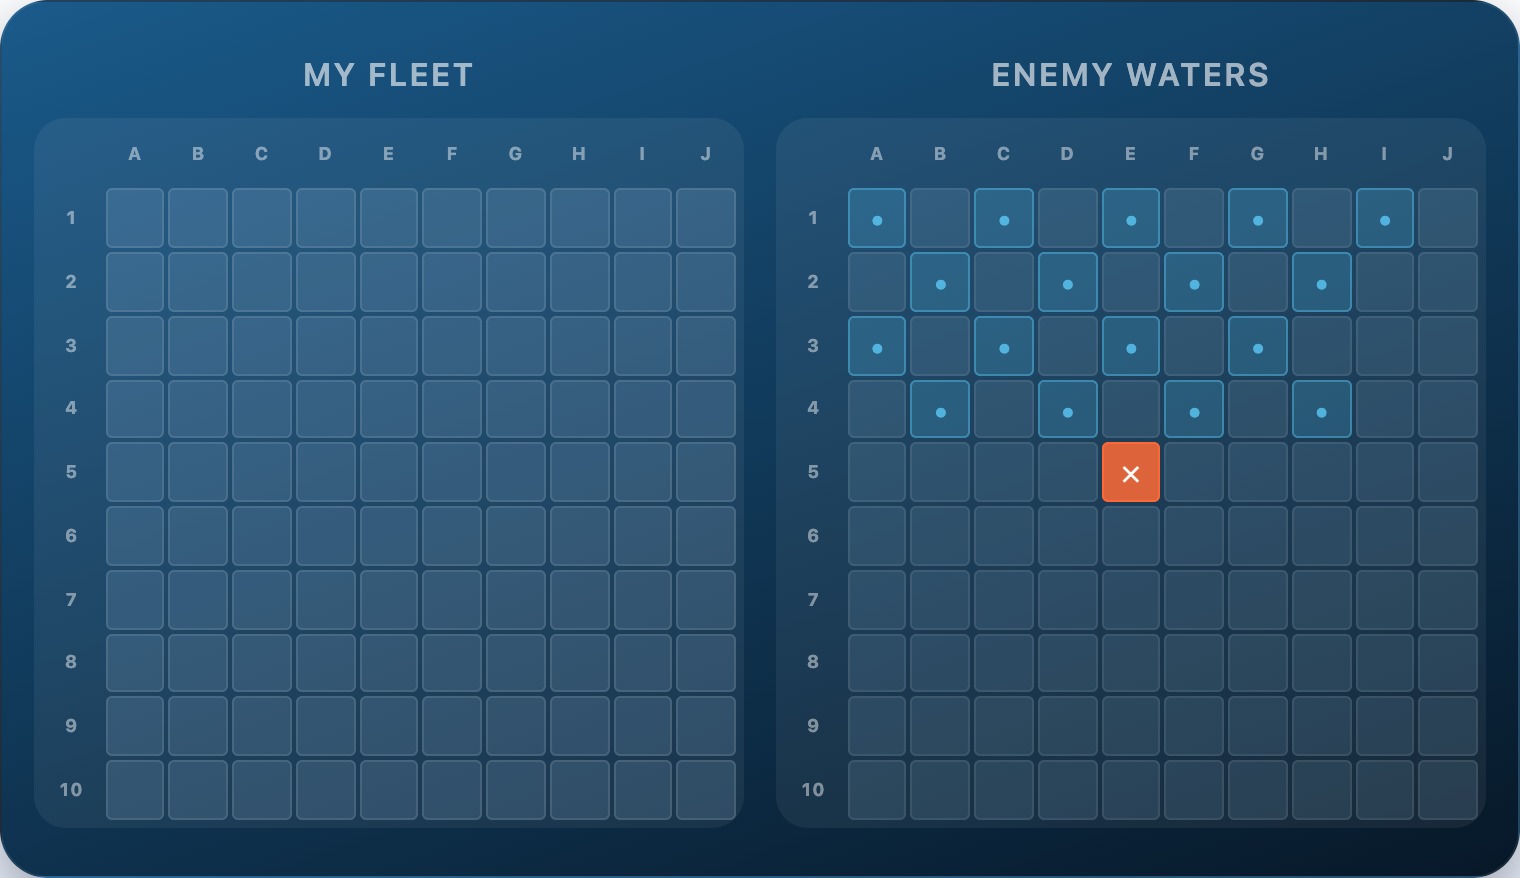
Rows A through D have been covered with a checkerboard pattern — no ship found. The hit at E5 switches the game to target mode. The four adjacent cells (D5, F5, E4, E6) are the next candidates. Fire one of them to determine the ship's axis.
Most beginners never formally separate these two phases. They fire randomly after a hit, waste shots on cells that the hit already ruled out, and return to random fire before the ship is sunk. Keeping the two phases explicit and disciplined is the most valuable habit in the game.
2. Hunt Mode — The Checkerboard Pattern
The most efficient hunt pattern covers the maximum number of ships with the minimum number of shots. The checkerboard achieves this.
Imagine the 10×10 grid as a chessboard. Color each cell alternating black and white. Every ship — even the smallest, the two-cell Destroyer — must occupy at least one cell of each colour. This means firing at all cells of one colour guarantees a hit on every ship, using only 50 shots to cover the entire board.
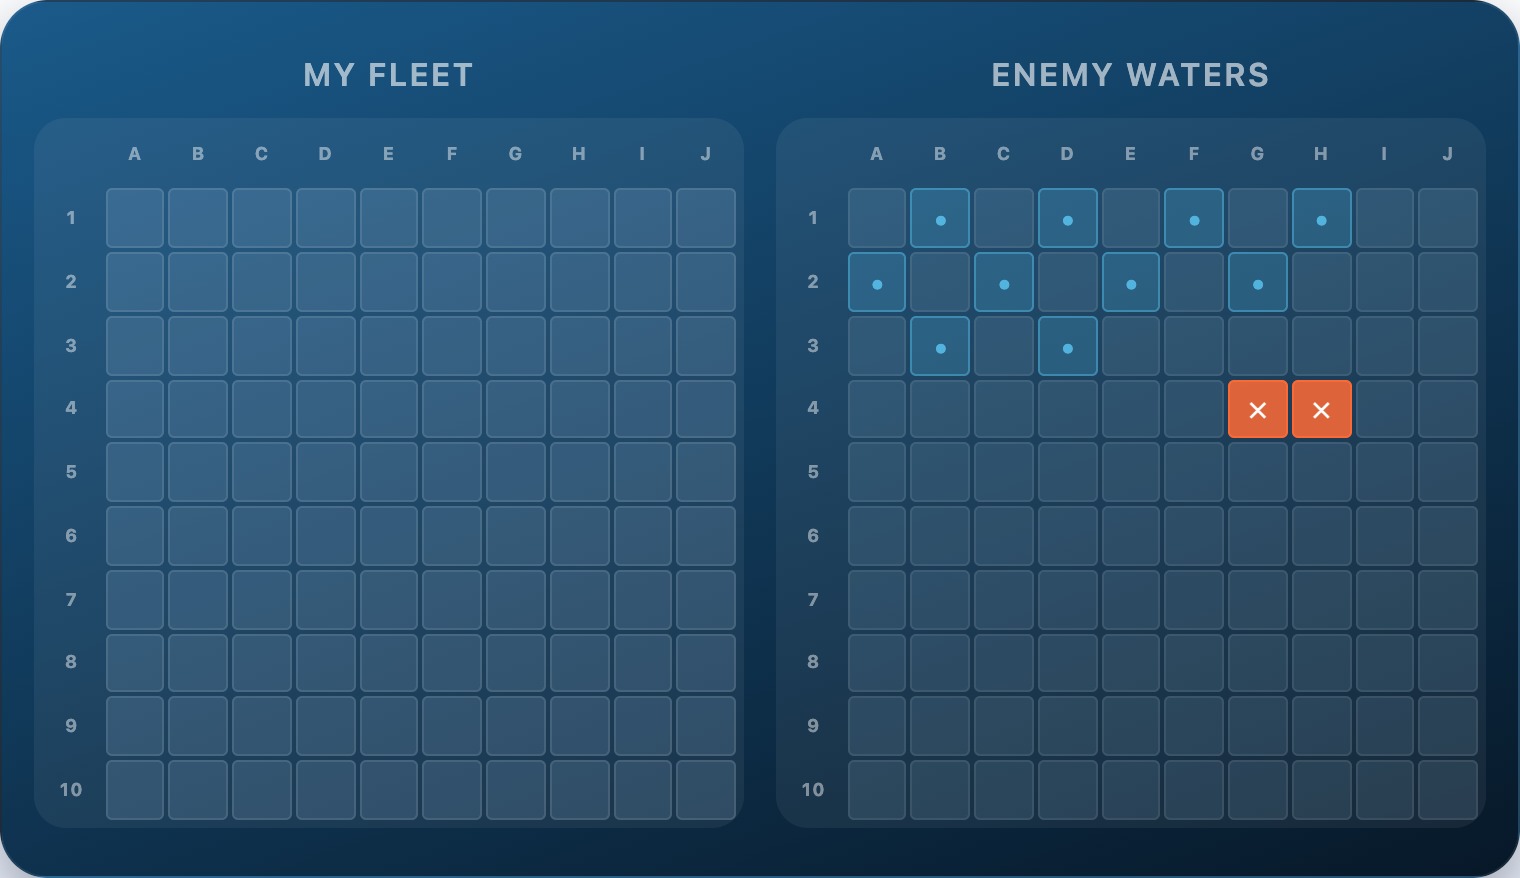
All 50 checkerboard cells marked. Any ship placed anywhere on the board must overlap at least one of these cells. The Destroyer, at just 2 cells, is the hardest to catch — but even it cannot avoid this pattern entirely.
In practice you will not fire all 50 before finding ships — hits interrupt the pattern and switch you to target mode. The checkerboard defines the order in which you search when you have no hit to pursue.
3. Target Mode — Axis Locking
When you score a hit, you know one cell of a ship but not its orientation (horizontal or vertical) or its full length. Target mode resolves this systematically.
Step 1: probe the four neighbours. Fire at the cells directly above, below, left, and right of your hit. One of these will be a hit or a miss. Misses tell you the ship does not extend in that direction.
Step 2: lock the axis. When you score a second hit adjacent to the first, you know the ship is horizontal (if the two hits share a row) or vertical (if they share a column). Stop firing perpendicular to that axis — those shots would only hit a different ship.
Step 3: extend along the axis. Fire outward along the confirmed axis in both directions until the ship is sunk.
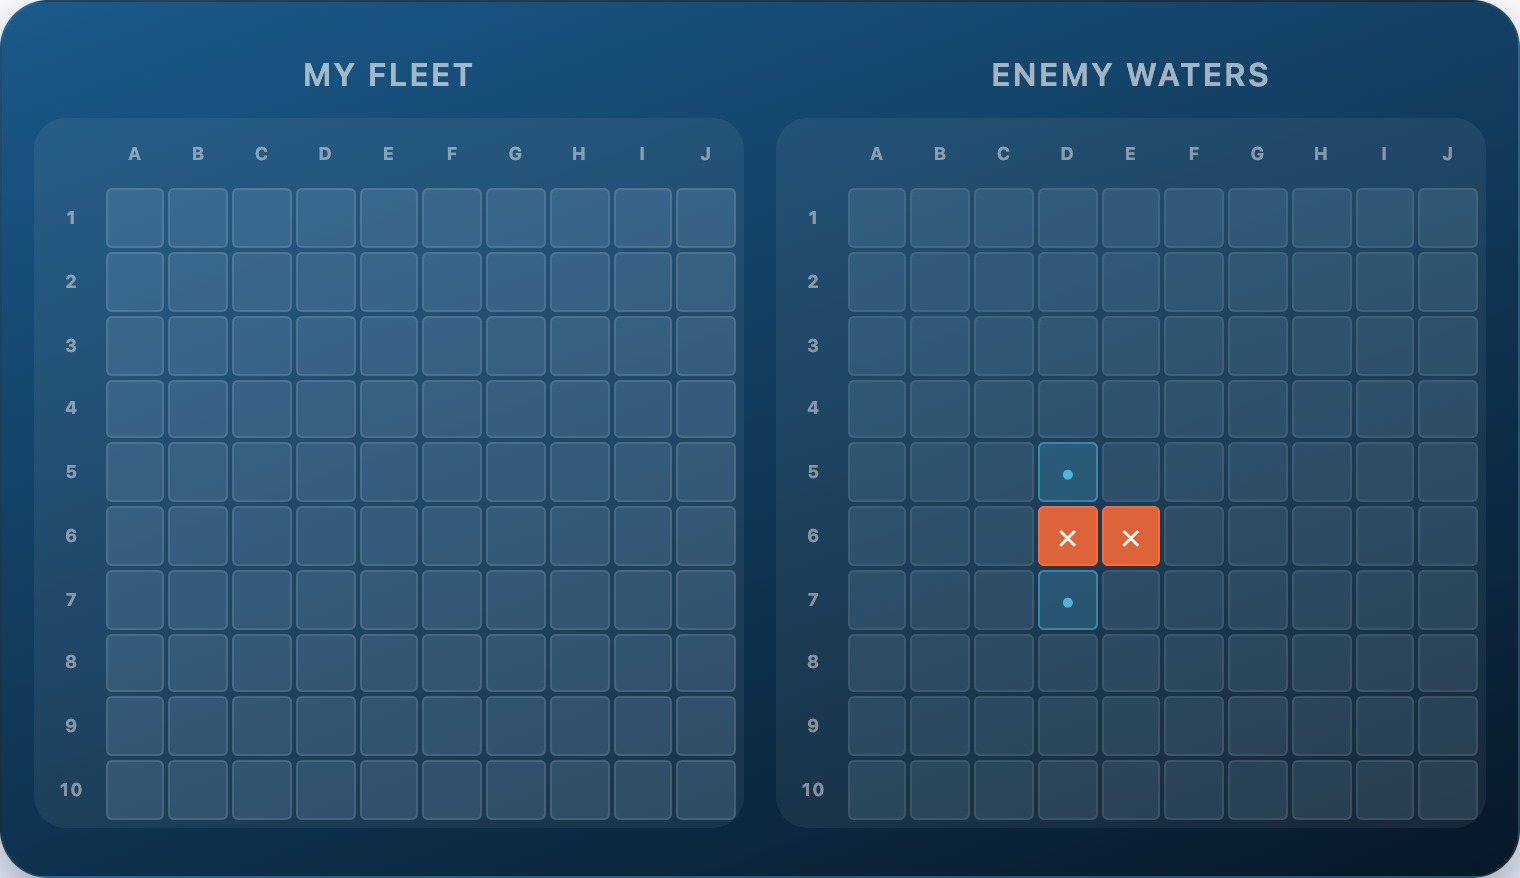
Two hits at F4 and F5 share row F — the ship is horizontal. Misses at E4 and G4 confirm nothing vertical. The only productive next shots are F3 (extending left) and F6 (extending right). Any other shot wastes the information the hits provided.
The most common target-mode mistake is firing perpendicular cells after a second hit. Axis locking eliminates that waste entirely.
4. Using Hit Count to Identify Ship Length
As you score consecutive hits, count them. The fleet has exactly one ship of each length (except the 3-cell ships, of which there are two). Knowing how many hits you have scored in a sequence tells you which ship you are sinking.
- 2 consecutive hits: Destroyer (2) possible — keep firing to confirm
- 3 consecutive hits: Cruiser (3) or Submarine (3) — the ship is sunk, return to hunt
- 4 consecutive hits: Battleship (4) — the ship is sunk
- 5 consecutive hits: Carrier (5) — the ship is sunk
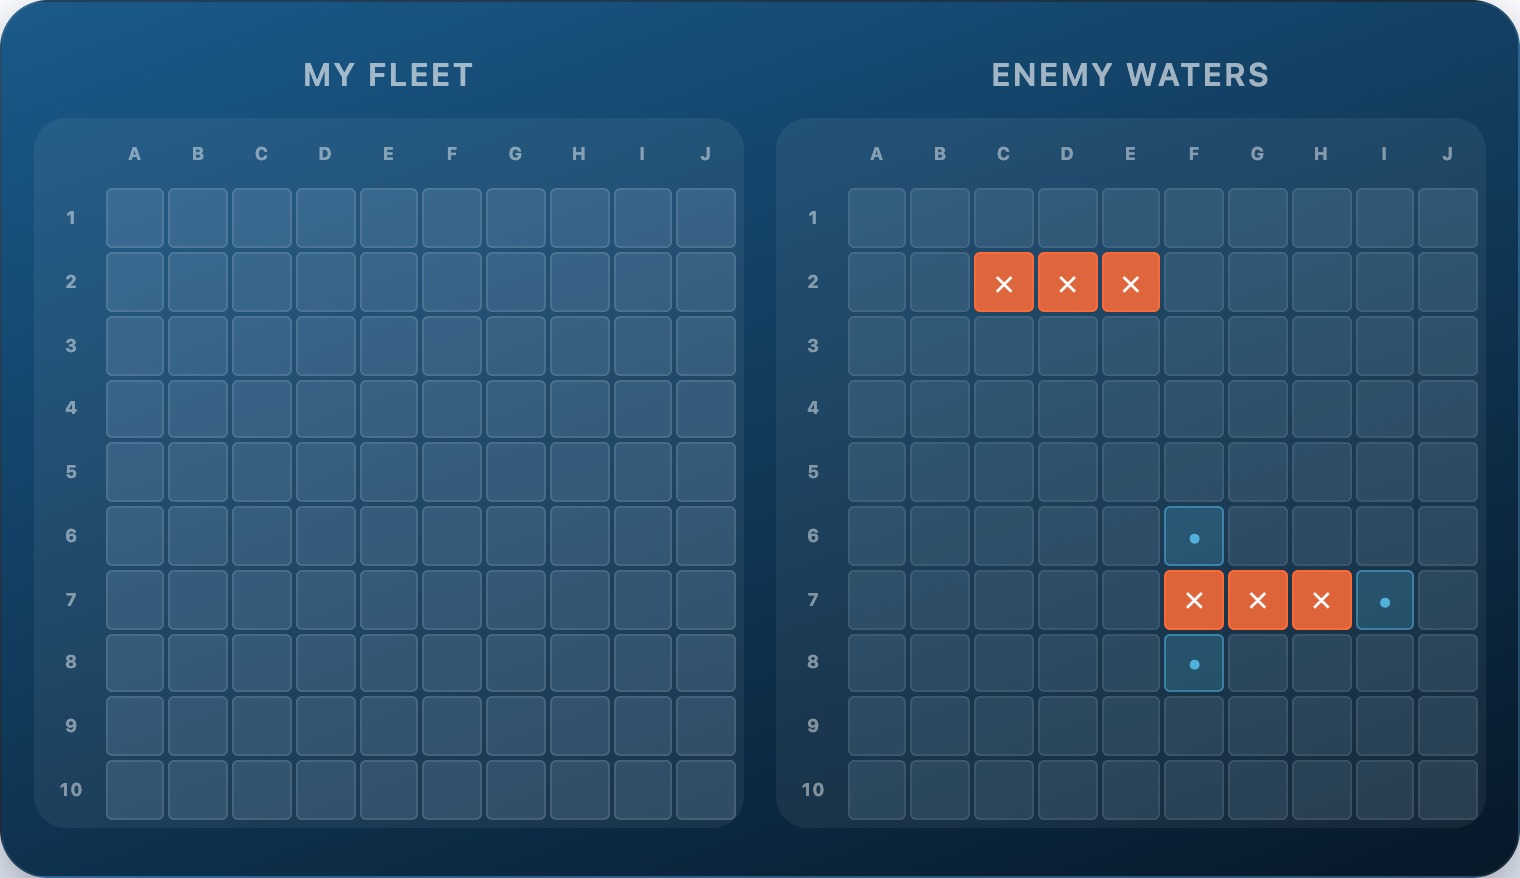
The Submarine is sunk (B3-B4-B5, 3 cells). The active sequence at G6-G7-G8 already has 3 hits. Misses at G9 (right end) and F6/H6 (vertical) confirm horizontal orientation. The ship must extend left — fire G5. If it hits, this is the Battleship (4 cells). If it misses, this was the Cruiser (3 cells) and the ship is already sunk.
Tracking hit counts per sequence prevents you from continuing to fire along a sunk ship's axis. The moment the count matches a remaining ship's size, stop and return to hunt mode.
5. Ship Placement Strategy
Your placement decisions are made once per round, but their effect lasts the entire game. Poor placement is exploited even by moderately skilled opponents.
Spread your fleet. Clustering ships in one area means a systematic searcher finds multiple ships with the same sequence of shots. Spread ships across different quadrants.
Avoid the edges for small ships. The checkerboard pattern naturally covers interior cells well. Ships placed entirely along edges — especially corners — are slightly harder to locate because edge cells have fewer neighbours. However, edge placement for large ships is predictable and often checked early by experienced players.

Carrier runs vertically along column 2. Battleship is horizontal in the middle right. Cruiser sits in the upper right. Destroyer is in the lower left corner. No two ships share a quadrant, making a localised search sequence unlikely to find more than one ship.
Vary orientation. An all-horizontal or all-vertical fleet is easier to search because your opponent can rule out entire rows or columns quickly. Mix horizontal and vertical ships.
Avoid the very centre. Many players start their hunt near the centre. Placing all large ships in the centre makes early hits more likely.
6. Deduction — Eliminating Impossible Positions
Every shot — hit or miss — reduces the set of possible ship positions. Good players track this reduction explicitly and stop firing at cells that ships cannot possibly occupy.
After sinking a ship, cross off all cells adjacent to its hull. Ships cannot touch each other, so the cells surrounding a sunk ship are guaranteed to be empty of other ships.
After a run of misses along an axis, that gap is too small for any remaining ship of that length. If you have five consecutive misses in a row segment, no remaining ship with more than one cell fits in that gap.
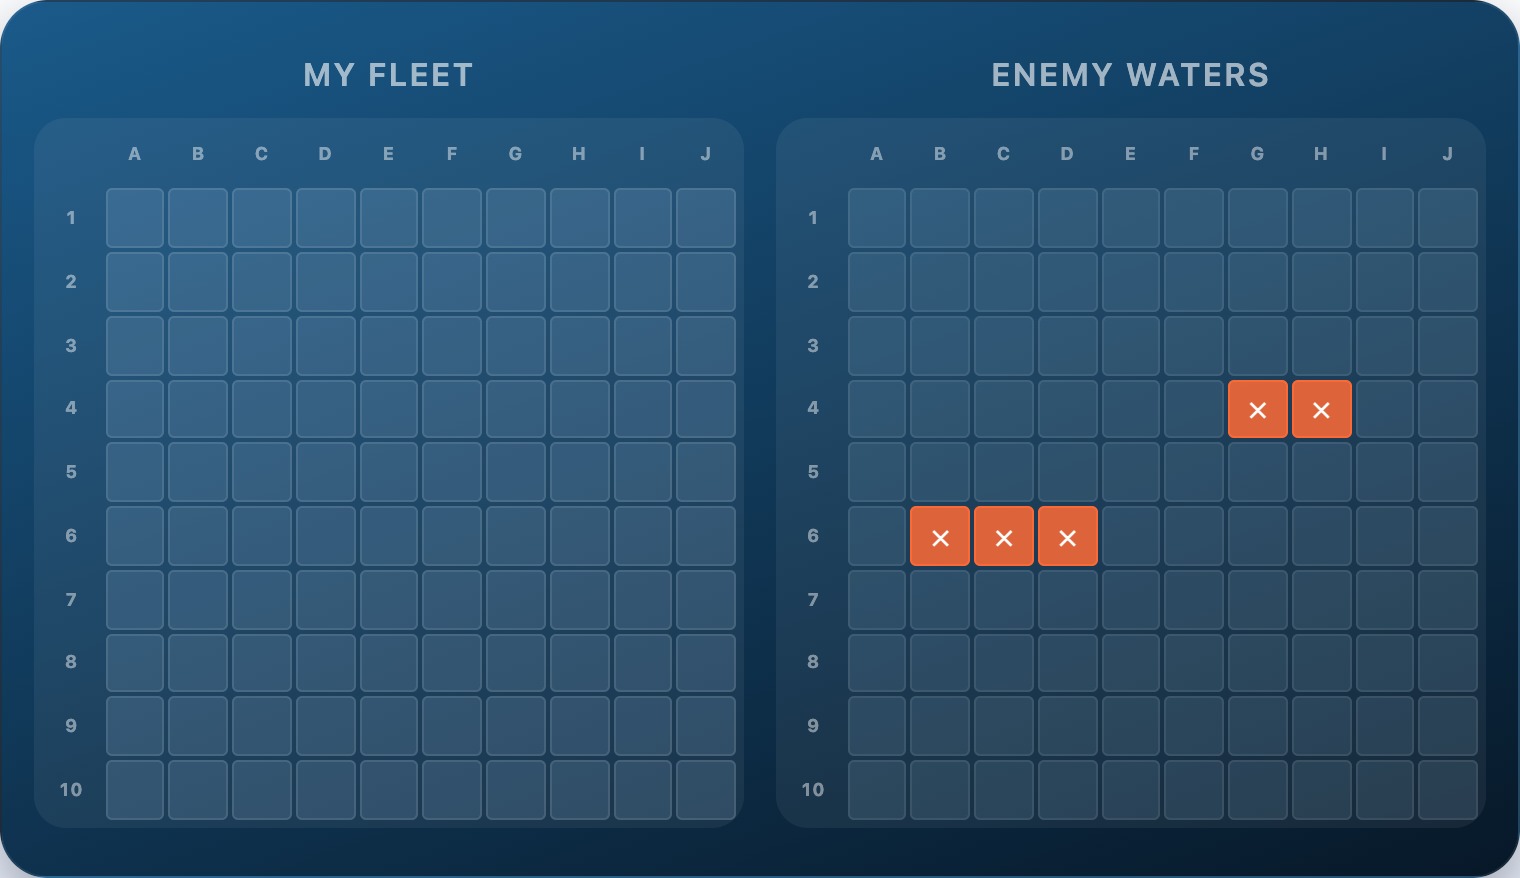
The Destroyer sunk at D7-D8 eliminates ten surrounding cells from the remaining search. Those cells cannot contain any ship. The effective search space for the remaining four ships has shrunk by ten cells in a single deduction.
Apply adjacency elimination after every sunk ship. Over the course of a game, this narrows the search area substantially and eliminates wasted hunt shots.
7. Calibrating Hunt Spacing to Remaining Ships
Once ships are sunk, the smallest remaining ship determines the minimum hunt spacing you need.
The checkerboard pattern (spacing of 2) guarantees hitting any ship of size 2 or larger. Once the Destroyer is sunk, the smallest remaining ship is size 3. You can now use a wider spacing — fire every third cell instead of every other — and still guarantee hitting every remaining ship while covering the board in 34 shots instead of 50.
Two ships sunk. The remaining fleet — Carrier, Battleship, Cruiser — all have 3 or more cells. A spacing-3 pattern covers the board in 30 shots and still guarantees a hit on every remaining ship. Continuing the checkerboard wastes 20 potential shots.
This calibration matters most in close games. Reducing your expected hunt shots by 20 can be the margin between winning and losing a long sequence.
8. The Most Common Strategic Mistakes
Returning to random fire after a hit. Once you have a hit, finish the ship before resuming hunt mode. A ship left half-found wastes information from the hits you already scored.
Firing perpendicular cells after axis confirmation. Once two consecutive hits define the axis, stop firing across it. You already know the ship does not extend that way.
Placing ships in a cluster. Grouping ships in one area makes your opponent's hunt more efficient. Every hit gives them proximity information about multiple ships at once.
Ignoring adjacency after a sunk ship. The cells surrounding a sunk ship are empty. Failing to eliminate them means continuing to waste hunt shots on cells you already know cannot contain a ship.
Using full checkerboard spacing late in the game. When only large ships remain, spacing-3 covers the board faster and is mathematically sufficient. Continuing with spacing-2 burns extra shots.
Apply These Ideas in a Game
Strategy is built through repetition. Play Battleship on Playboard — challenge a friend online or test your hunt patterns against a bot, no sign-up needed.
Frequently Asked Questions
- What is the best way to search for ships in battleship?
- Fire in a checkerboard pattern during hunt mode — alternate between black and white squares on the grid. Because every ship occupies at least two consecutive cells, a checkerboard guarantees you cannot miss any ship regardless of where it is placed. This halves the number of shots needed to guarantee a hit compared to firing randomly.
- What should I do immediately after getting a hit?
- Switch from hunt mode to target mode. Fire at the four adjacent cells — up, down, left, right — until you score a second hit. Once you have two consecutive hits you know the ship's axis, so fire along that axis in both directions until the ship is sunk. Do not return to your hunt pattern until the ship is fully sunk.
- Where should I place my ships?
- Spread them across all areas of the board and avoid clustering ships close together. Ships near the edges are harder to find with the checkerboard pattern because edge cells have fewer neighbours, so placing ships slightly inward denies your opponent efficient search paths. Avoid predictable patterns like all-horizontal or all aligned near the centre.
- Should I try to sink the largest ship first or the smallest?
- In most cases, sink whichever ship you have hits on — do not switch targets mid-hunt. However, knowing which ships remain unsunk lets you calibrate your hunt pattern. Once all three-cell ships are sunk, you can widen your hunt spacing because only the Carrier (5 cells) and Battleship (4 cells) remain, and they cannot hide in small gaps.
- How do I avoid wasting shots in target mode?
- After two consecutive hits, you know the ship's axis (horizontal or vertical). Fire along that axis only — do not waste shots perpendicular to it. Keep track of how many hits you have scored and how long the ship you are targeting is. Once you have hit every cell of that ship's length, stop firing in that direction.
- Is there a pattern my opponent might predict?
- Yes. The pure checkerboard is widely known, and experienced opponents sometimes place smaller ships entirely on the colour you are skipping. Mixing in occasional off-pattern shots, or shifting the checkerboard phase partway through the game, makes your hunt less predictable without abandoning the core efficiency.